Saturday 9 April 2011

::next try::

pokok serai

pokok apa pn tktau..hehe

bunga kertas

??

~My Younger Sister~

ok dak?? ni time aku tkda keja nak buat. jadi, aku buat lah keja nih. hahahh.klau tak ok tu, tegur2 laa. SAYA BUDAK BARU BELAJAR ..

light photography~~


1. Saint-Tropez(Geishaboy500)


Image: geishaboy500
For this sparking image taken under a south coast pier, the photographer employed a Speedlight flash, a pair of Maglites, LED light sticks, coloured gels and absolutely no Photoshop trickery. The photograph is taken straight from the camera, using exposures of up to thirty seconds.

2. Ultimate (Anotherfaceintheclouds)

This stunning image is an example of light art performance photography (LAPP), which is a high-end evolution of light graffiti. The image is a single photograph capturing the movement of specially developed coloured lights and luminous tools.

3. Light Graffiti (Guille Pagano)


Image: guillePagano
Guille Pagano’s shot captures a snaking trail of light meandering through some beer bottles.

4. Goku (Artwork Rebel)

Goku is a Japanese manga character whose special abilities include firing energy blasts formed by chi energy. In this image, the photographer uses light graffiti to give a plastic Goku figure this superhuman ability.

5. Light Graffiti (Eric Castro)


Image: Eric Castro
Eric Castro paints a pair of angel wings on his model in this photograph.

6. Flashlight Fight (Artwork Rebel)

This image comprises six images layered in Photoshop, capturing ‘fighting’ flashlight trails.

7. My Bike (Habi)


Image: Habi
In this image, the photographer has painted the frame of his bicycle using the front light.

8. Light Painting with LEDs (Tom Arthur)


Image: tom.arthur
Tom Arthur used green and purple LEDs to paint the spiralling trails in this image.

9. Eleven-Hour Star Trails (Josch Hambsch)

Josch Hambsch achieved this awesome photograph by aiming the camera at the sky and leaving the shutter open for an almost all-night exposure of eleven hours. The stars’ trails reveal the spinning motion of the Earth, in this instance the South Celestial Pole as seen from Namibia.

10. Astronaut (Collin) (Epioles)


Image: Epioles
The light graffiti in this picture is painted with a sparkler.

11. Light Painting (Philip Bitnar)

There’s a certain spooky ambience in Philip Bitnar’s experiment in light painting.

12. Light Painting (Laughtonb)


Image: laughtonb
The photographer employed a night-time ‘camera toss’ technique to produce this stunning Spirographic abstraction.

13. Light Painting with a 3pi Robot (Donjd2)


Image: donjd2
This photograph was made using a twenty-second exposure to capture the path of a Polou 3pi Robot following a course laid out with black electrical tape. The robot is fitted with red, blue and green LEDs to create the light trails seen in the image.

14. Painting Scissors with Light (Sociotard)


Image: sociotard
A pair of scissors jammed into a mirror and a sparkler were used to make this intriguing long exposure photograph.

15. Fire Sparks (Stillwellmike)

A slow shutter speed reveals the movements of glowing embers from a roaring campfire in this image.

16. Wine Fairy (Dimbledar)


Image: dimbledar
This stylish sepia shot follows painted light around a glass of red wine.

17. Wire Wool Poi

This long exposure photograph captures a fire dancer spinning wire wool held in chicken wire cages, which are dipped in paraffin and set on fire.

18. Among Us (Ben Matthews)


Image: benmatthews
This beautifully composed woodland shot is made using red and blue lights.

19. Interstate 35 Long Exposure (Nikolai O)


Image: Nikolai O
The stillness of the wire fencing contrasts nicely with the streaming lights of the traffic on the interstate freeway in this long exposure shot taken near Burnsville, Minnesota.

20. Cold Cathode Light Paint (Maticulous)


Image: maticulous
In this fish-eyed view, a two-minute exposure records the movements of 

Friday 8 April 2011

Shutter Tips At Night

DSLR camera settings and tips for taking city landscapes at night

One of the reasons enthusiasts purchase SLR digital cameras, is to take night photographs in and around the city without them resulting in blurred or shaky images. However, as you'll soon find out, it's not as easy as setting your digital camera to automatic and shooting the image. Listed below are tips that will help you take city landscape photographs after dark.

Digital SLR settings for night photography

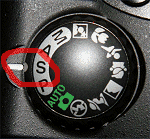
  1. Set your camera to shutter priority. On a Canon DSLR you turn the top dial to TV. Whereas on some SLR models, like the Nikon D40 for example, shutter priority is displayed as the letter S. If your camera doesn't have TV or S then refer to your camera manual.

    shutter priority Nikon D40 shutter priority on Canon DSLR

  2. If you have a tripod handy, set the ISO to the lowest setting your camera will go. For example, Canon EOS 400D will go as low as 100 ISO, whereas a Nikon D40 will go to 200. If you don't have a tripod, look for something you can rest your camera on. For example a stone or brick wall.

    If you absolutely need to hand hold your camera, the only choice of SLR settings you have for night photography is to set it to P (Program) and up the ISO to 800 - 1600. You can then skip over step 3 below. Note: This usually isn't recommended for high quality night shots.
  3. For high quality night shots, the shutter needs to be set at a slow speed. This allows the camera enough time to let light in to the sensor, without increasing yourISO setting. How slow depends on the time of night and how dark it is. There is no set shutter speed to suit every situation. However I've found if you take one photograph at 10 seconds, one at 20 and one at 30. Then view the image on your LCD display and see which one shows the most light. From there you will be able to judge how slow the shutter speed needs to be for the rest of your photo's on that particular night.

    The mistake many photographers do, is to set their shutter speed too fast. For example the night shot below was taken with a one second shutter. As you can see, this wasn't long enough to allow the light in to the camera's sensor.

    example of one second shutter speed at night

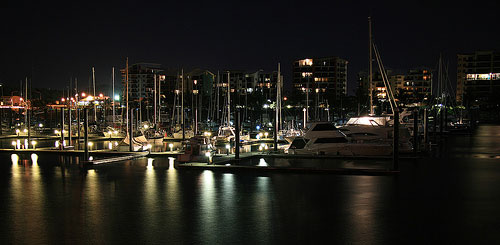
    I recognised this instantly and reshot the photograph using a slower shutter speed of 15 seconds. This time the SLR camera was given more time to allow the light in to the sensor, resulting in a clearly focused night shot that you can see below.


    example of night shot 15 second shutter speed
    Mackay Harbour Marina Australia
    Camera: Canon EOS 400D / Rebel XTi
    Lens: Canon EF-S17-85mm f/4-5.6 IS USM
    Exposure: 15 sec (15)
    Aperture: f/5
    Focal Length: 33 mm
    ISO Speed: 100
    Exposure Program: Shutter priority
    Flash: Flash did not fire
    Why this night shot worked
    The shutter speed was set to a slow 15 seconds. Therefore I was able to keep the ISO set to a high quality 100. Of course shooting at such a slow speed also required a sturdy tripod. You won't be able to hand hold a digital camera for 15 seconds without shaking.

    If you don't have a tripod handy, the other option is to up the ISO to 800 or 1600, then keep the shutter speed fast. However, the quality of the night shot will be grainy or noisy, and is usually not recommended.


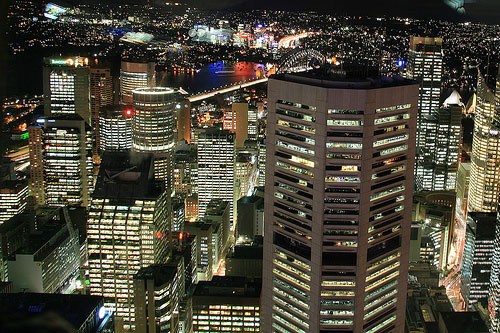
    Here is another example of a night photograph, this time the shutter speed is 30 seconds.


    30 second shutter speed night shot
    Sydney Australia
    Camera: Canon EOS 400D / Rebel XTi
    Lens: Canon EF-S17-85mm f/4-5.6 IS USM
    Exposure: 30 sec (30)
    Aperture: f/7.1
    Focal Length: 17mm
    ISO Speed: 100
    Exposure Program: Shutter priority
    Flash: Flash did not fire
    Why this night shot worked
    The ISO was kept to a high image quality 100, while the shutter speed set to a slow 30 seconds. The night photograph was taken from a 260 meter-high Sydney Lookout Tower where tripods were forbidden. Therefore I sat my SLR camera on a binocular stand.


MusicDumper.com - Free MP3 Downloads, Music Search and Embed Codes for your Profile!

MusicDumper.com - Free MP3 Downloads, Music Search and Embed Codes for your Profile!

my first try

what flower??i dont know la.heheh

ni aku snap kat blakang rumah aku.hehehh.saja la try2 kan.elok tak elok,taktau lah.biasalah.orang tak pro lagi.hmm

::shutter tips::

Thursday 7 April 2011

~ The Rules Of Third ~


The “Rule of Thirds” one of the first things that budding digital photographers learn about in classes on photography and rightly so as it is the basis for well balanced and interesting shots.
I will say right up front however that rules are meant to be broken and ignoring this one doesn’t mean your images are necessarily unbalanced or uninteresting. However a wise person once told me that if you intend to break a rule you should always learn it first to make sure your breaking of it is all the more effective!

What is the Rule of Thirds?

The basic principle behind the rule of thirds is to imagine breaking an image down into thirds (both horizontally and vertically) so that you have 9 parts. As follows.
rule-of-thirds
As you’re taking an image you would have done this in your mind through your viewfinder or in the LCD display that you use to frame your shot.
With this grid in mind the ‘rule of thirds’ now identifies four important parts of the image that you should consider placing points of interest in as you frame your image.
Not only this – but it also gives you four ‘lines’ that are also useful positions for elements in your photo.
rule-of-thirds
The theory is that if you place points of interest in the intersections or along the lines that your photo becomes more balanced and will enable a viewer of the image to interact with it more naturally. Studies have shown that when viewing images that people’s eyes usually go to one of the intersection points most naturally rather than the center of the shot – using the rule of thirds works with this natural way of viewing an image rather than working against it.
In addition to the above picture of the bee where the bee’s eye becomes the point of focus here are some of examples:

rule-of-thirds

Another Rule of Thirds Example

In this image I’ve purposely placed the head of my subject on one of the intersecting points – especially his eyes which are a natural point of focus for a portrait. His tie and flower also take up a secondary point of interest.
rule-of-thirds
In this shot I’ve placed the subject along a whole line which means she is considerably off center and therefore creating an additional point of interest. Placing her right in the center of the frame could have resulted in an ‘awkward’ shot.
In a similar way a good technique for landscape shots is to position horizons along one of the horizontal lines also as I’ve done with the following shot (I’ll let you imagine the lines).
rule-of-thirds
Using the Rule of Thirds comes naturally to some photographers but for many of us takes a little time and practice for it to become second nature.
In learning how to use the rule of thirds (and then to break it) the most important questions to be asking of yourself are:
  • What are the points of interest in this shot?
  • Where am I intentionally placing them?
Once again – remember that breaking the rule can result in some striking shots – so once you’ve learnt it experiment with purposely breaking it to see what you discover.
Lastly – keep the rule of thirds in mind as you edit your photos later on. Post production editing tools today have good tools for cropping and reframing images so that they fit within the rules. Experiment with some of your old shots to see what impact it might have on your photos.


Read more: http://www.digital-photography-school.com/rule-of-thirds#ixzz1ItvIn8Cl